
The Case record acts as flexible container for case management of multiple assessments
The Case record acts as flexible container for case management of multiple assessments
| Register | Uses |
|---|---|
| Persons | For managing contact information of affected persons |
| Needs & Tasks | For recording the recovery needs and followup tasks for the Case |
| Private Assets | For recording details and evidence of impacted assets of the case/property |
| Infrastructure | Track and manage infrastructure such as roads, culverts, signs and facilities that have been affected by disasters Can be added to Cases or standalone |
| Livestock | For recording impacted livestock |
| Environmental Health | For recording detailed environmental health assessments of the property |
| Agriculture | For recording impacted agriculture |

Location of the Cases register in the Recovery module
| Security Policy | Use |
|---|---|
| Recovery Case Core - Change Status Basic Access | Basic access to change the status for items in the register. Requires a Write policy to be selected. |
| Recovery Case Core - Create | Create a new items for register |
| Recovery Case Core - Read Only Assigned | Read Only access to assigned items for the register |
| Recovery Case Core - Read Only Full | Read Only access to all items for the register |
| Recovery Case Core - Read Write Assigned | Read Write access to assigned items for the register |
| Recovery Case Core - Read Write Full | Read read & write full access to register |
| Recovery Case Core - Read Write Own | Read Write own items for register |
| Recovery Case Optional - Assign Items | Assign Items for register. |
| Recovery Case Optional - Bypass state machine | Bypass state machine for register. Requires a Write policy to be selected. |
| Recovery Case Optional - Change Classification | Change System Classifications for register. Requires a Write policy to be selected. |
| Recovery Case Optional - Change special readonly (immutable) fields | Can change fields that have been configured to be readonly (immutable) once set. Requires a Write policy to be selected. |
| Recovery Case Optional - Change Status Full Access | Change Status Full Access for register. Requires a Write policy to be selected. |
| Recovery Case Optional - Item Bulk Create Access | Bulk Create Items for register. Requires the Create policy to be selected. |
| Recovery Case Optional - Item Bulk Edit Access | Bulk Edit Access for register. Requires a Write policy to be selected. |
| Recovery Case Optional - Item Change Event | Change Event for items in register. Requires a Write policy to be selected. |
| Recovery Case Optional - Item Import | Import items for register. Requires a Write policy to be selected. |
| Recovery Case Optional - Merge Items | Merge Items for register. Requires the Create policy to be selected. |
| Recovery Case Optional - Report Access | Report Access for register. |

Sample Cases register Datagrid

A sample Cases register map view with item summary

Cases filter menu
| Filter Group | Filter/s | CQL | Use |
|---|---|---|---|
| Main | |||
| Active | is:active | Finds all Cases with a positive Status code | |
| Recently Updated | is:active dateUpdated:>today-5d | Finds all Casesupdated in the last 5 days | |
| All | is:any | Finds all Cases | |
| Custom | [List is based on your system configuration]* | ||
| ATSI Cultural Specific Support | applicant:(ATSICulturalSupport:[yes,potentially]) OR relatedContacts:(ATSICulturalSupport:[yes,potentially]) | Finds Cases containing related Contacts with ATSI cultural support requirements | |
| Sharing Level - Not Yet Asked | sharingLevel:notYetAsked | Identifies Cases where consent has not been requested to share details | |
| Urgent Priority | priority:4 | Finds all Cases marked as Urgent | |
| High Priority | priority:3 | Finds all Cases marked as High Priority | |
| No Applicants | is:active applicant:none | Identifies Active Cases without a related Contact | |
| Major - Damage Primary Residence | is:active AND (privateAssets:(primaryPlaceOfResidence:true AND is:active AND buildingDamage:[4,3,2])) OR (recoveryEnvironmentalHealth:(is:active AND (waterOnsite:no OR isSepticAndEffluentLinesOperational:no OR hazardousChemicals:yes OR isPotentialHazardsPresent:yes OR electricityOnsite:no))) | Identifies Cases where there is major damage to the primary residence | |
| My Inspections Required | status:INSPECT assigned:@me | Finds Cases with a Status of Inspect that are assigned to you | |
| Property Damage | Damage Requires Inspection | propertyDamage:unsure | Identifies Cases where the Damage is possible and requires inspection/follow up flag is set |
| Primary Contact's Relationship to Property | [List is based on your system configuration]* | is:active relationshipToProperty: | Finds cases witha relationship to property match |
| Referral Source | [List is based on your system configuration]* | is:active referralSource: | |
| Classification | [List is based on your system configuration]* | is:active systemClassification: | |
| Region | |||
| No Region | is:active region:none | Finds all Assessments with no Region set | |
| [List is based on your system configuration]* | is:active region: | ||
| Workflow | |||
| Inspection Required | status:inspect | ||
| New | status:new | ||
| No Action Required | status:open_no_action | ||
| Open | status:open | ||
| Reopen | status:reopen | ||
| Resolved | status:resolved | ||
| Review | status:review | ||
| Active tags | is:active # | Any tags in use. Refer to: tags | |
| Assignments | |||
| Unassigned | is:active assigned:none | Finds all Cases not assigned to any Position | |
| [List is based on your system configuration]* |

Sample Case record with sections

Add persons section

Consent section
| Option | Consent message | Consent box colour |
|---|---|---|
| Primary contact(s) have not yet been asked (Default) | Please let the person know that the information they share will be recorded and shared with the appropriate agencies. | Orange |
| Do not share my details | Primary Contact does not consent to sharing information | Red |
| Share my full details with other agencies for use in recovery | Primary Contact consents to sharing information | Green |

Aborignal or Torres Strait Islander question
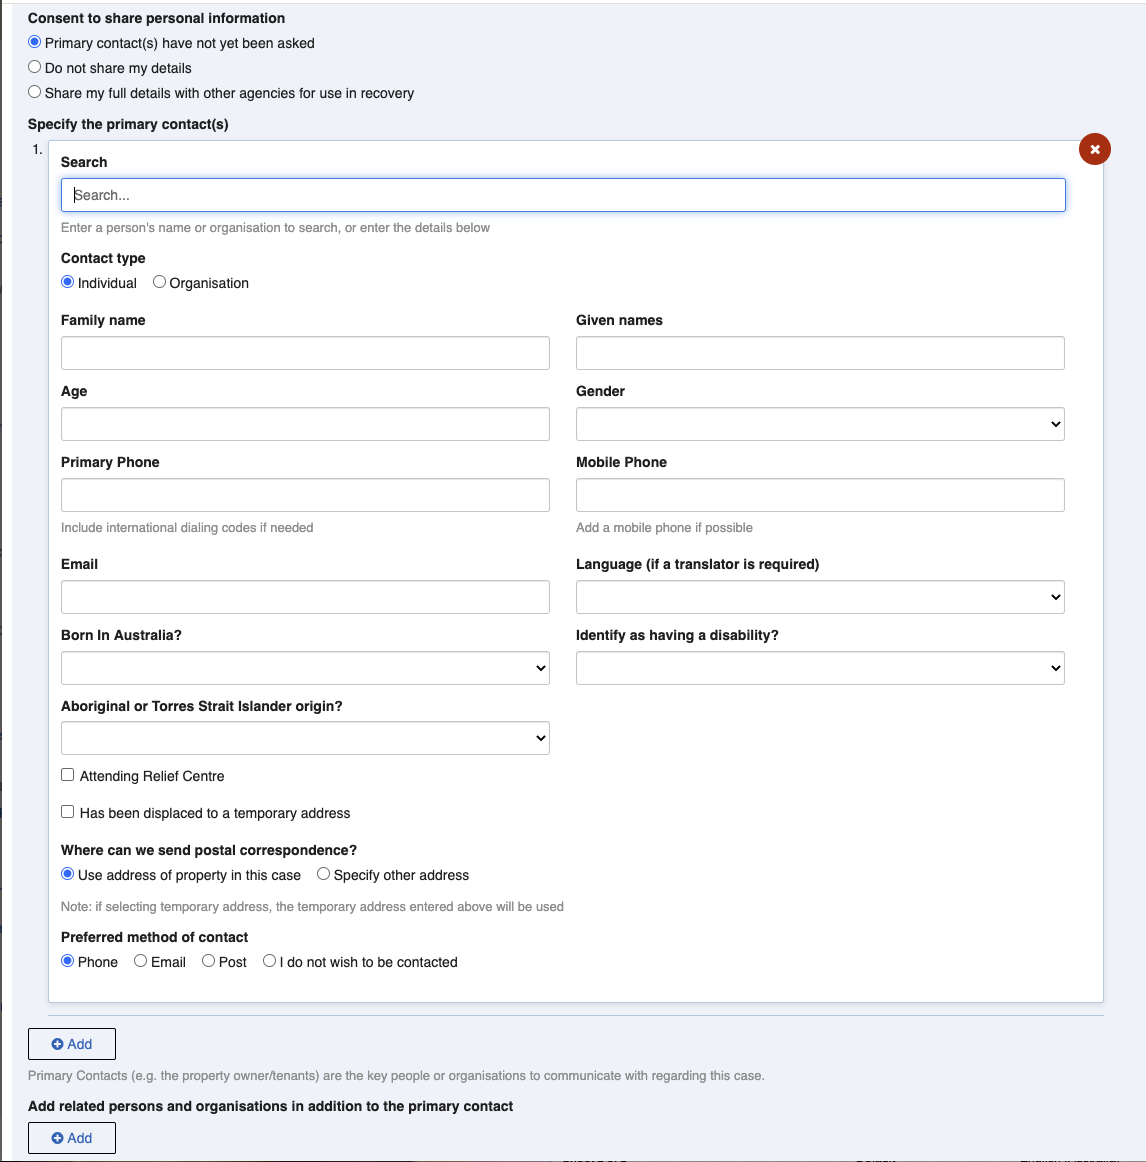
Affected Persons section

Related persons section
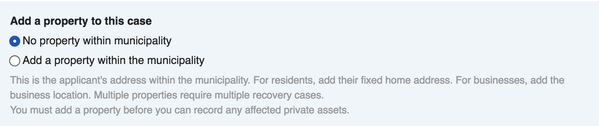
Adding property to a case
Add property section
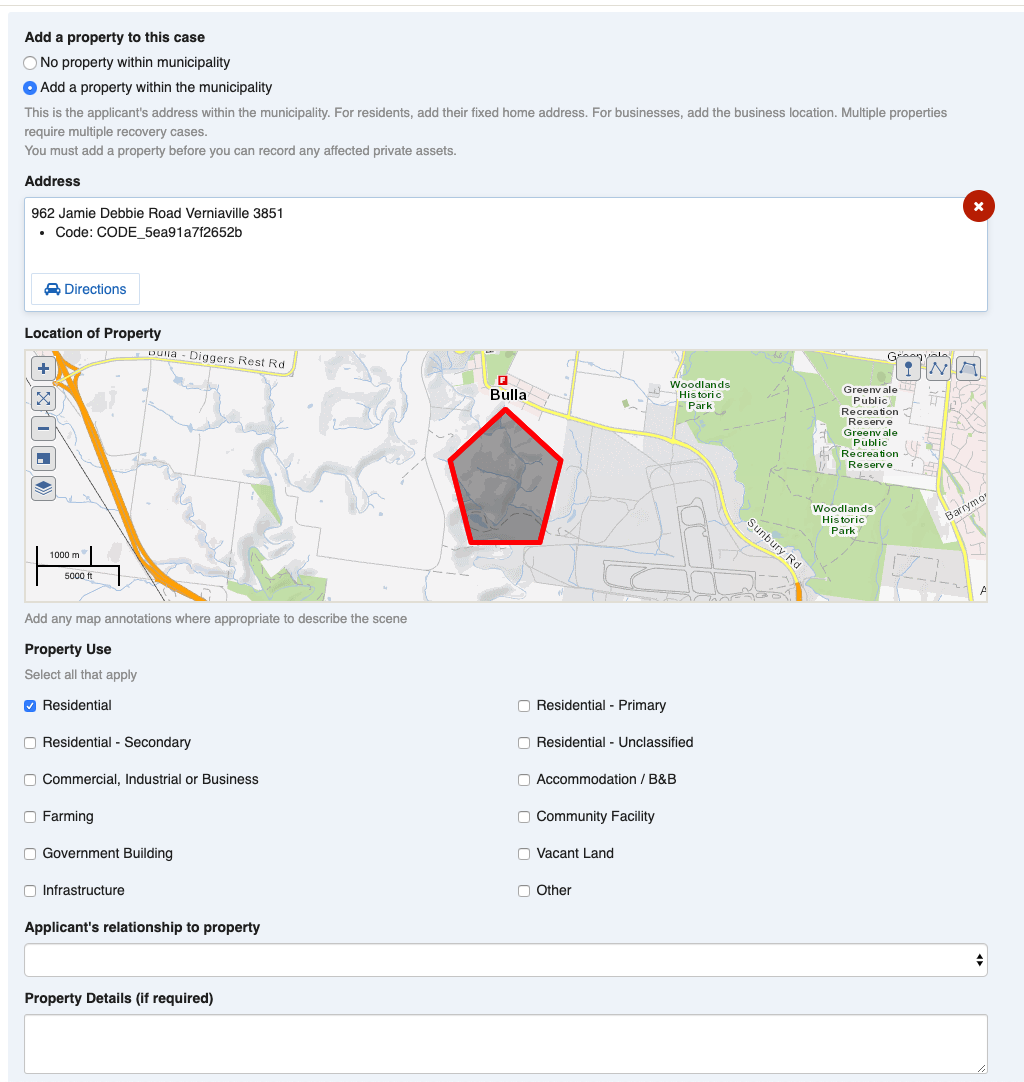
Property Damage section
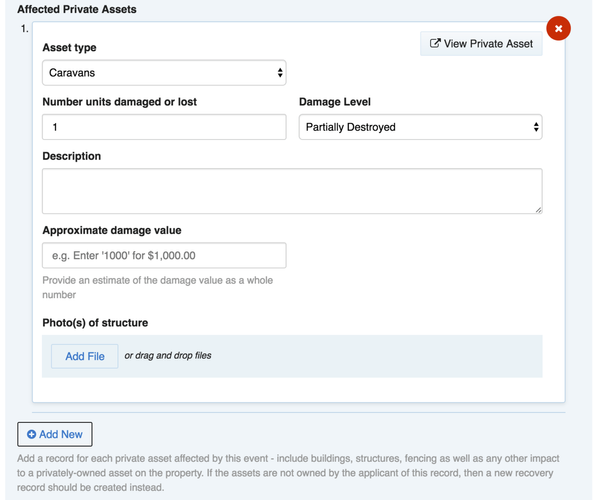
Private Assets section
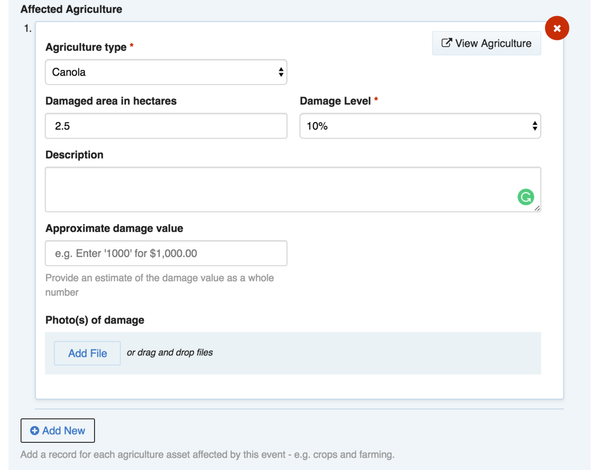
Affected Agriculture section
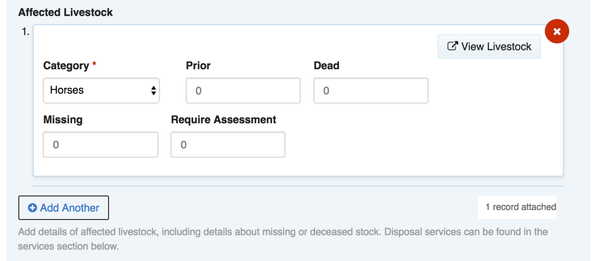
Affected Livestock section
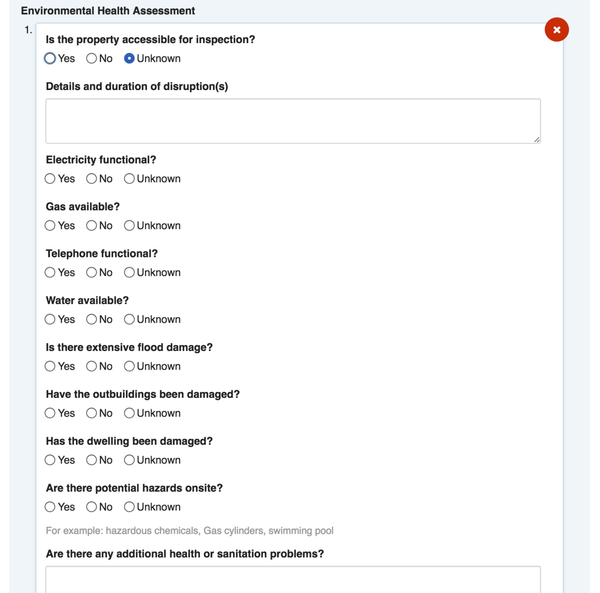
Environmental Health Assessment section

Needs & Tasks section

A case with multiple Needs and Tasks.

Case documents section

Sample Workflow section of a Case

General workflow for Cases
| Status | Datagrid Icon | Notes |
|---|---|---|
| New |  | All new Cases begin with this status |
| Open |  | Case is current and being worked on |
| Review |  | Case is under review |
| Inspection Required |  | An inspection has been requested |
| No Action Required |  | Case doesn't require any further action, but will remain in reports |
| Resolved |  | Resolved cases are awaiting final review and closure by a Recovery Manager |
| Closed |  | Closed cases are no longer active and will disappear from active filters |
| Reopen | Closed cases can be set to this status if they require further work after being closed. |

Related Items showing Related Assessments

Hazard Status section of a Case with potential hazards onsite

Financial section
 button (or drop down the list from any other register and select it)
2. Complete each section of the [Case Settings](#case-settings) as required. Note that some options may open up new sections to complete.
3. Save the Case
button (or drop down the list from any other register and select it)
2. Complete each section of the [Case Settings](#case-settings) as required. Note that some options may open up new sections to complete.
3. Save the Case  New Cases will appear with a Status of **New**.
## Bulk Actions
{% content-ref url="../../concepts-and-fundamentals/on-a-computer/using-the-datagrid/bulk-actions" %}
[bulk-actions](https://docs.cw.crisisworks.com/concepts-and-fundamentals/on-a-computer/using-the-datagrid/bulk-actions)
{% endcontent-ref %}
The following additional bulk actions can be performed on Cases via the Actions menu:
| Action |
| ----------------------------------------------------------------------------------------------------- |
| [Copy IDs](#copy-ids) |
| [Bulk Edit](#bulk-edit) |
| [Bulk Create Tasks](#bulk-create-tasks) |
| [Create a Copy](#create-a-copy) |
| [Copy to Relief Registration](#copy-to-relief-registration) |
| [Merge](#merge) |
| [Send Communication](#send-communication) |
| [Export Detailed Cases to Report](#export-detailed-cases-to-report) |
| [Export Cases with basic applicant data to Report](#export-cases-with-basic-applicant-data-to-report) |
### Copy IDs
Refer to: [Copy IDs](https://docs.cw.crisisworks.com/concepts-and-fundamentals/on-a-computer/using-the-datagrid/bulk-actions#copy-ids)
### Bulk Edit
Refer to: [Bulk Edit](https://docs.cw.crisisworks.com/concepts-and-fundamentals/on-a-computer/using-the-datagrid/bulk-actions#bulk-edit)
Update for multiple Cases:
* Notes
* Event
* Region
* Status
* Priority
* Case Officer
* Field Officer
* Referral Source
* Classifications
* Tags
### Bulk Create Tasks
Use this action to add [Needs & Tasks](#needs-and-tasks-1) for multiple Cases.
### Create a Copy
Refer to: [Create a Copy](https://docs.cw.crisisworks.com/concepts-and-fundamentals/on-a-computer/using-the-datagrid/bulk-actions#create-a-copy)
### Copy to Relief Registration
Use this action to copy the Contacts in the Case to a [Relief Registration](#requests-assigningarequest-5). This can be used in cases where a Relief Registration wasn't initially created but you still need a record for one.
### Merge
Use this action to merge cases that are duplicates of one another.
To do this:
1. Navigate to the **Recovery Case** datagrid
2. Ensure all datagrid items are deselected, by clicking the checkbox icon at the top left of the datagrid until the checkboxes for individual items are clear.
3. Select two or more cases that are duplicates, by checking their select boxes.
4. Go to the **Actions** menu, and select **Merge**
New Cases will appear with a Status of **New**.
## Bulk Actions
{% content-ref url="../../concepts-and-fundamentals/on-a-computer/using-the-datagrid/bulk-actions" %}
[bulk-actions](https://docs.cw.crisisworks.com/concepts-and-fundamentals/on-a-computer/using-the-datagrid/bulk-actions)
{% endcontent-ref %}
The following additional bulk actions can be performed on Cases via the Actions menu:
| Action |
| ----------------------------------------------------------------------------------------------------- |
| [Copy IDs](#copy-ids) |
| [Bulk Edit](#bulk-edit) |
| [Bulk Create Tasks](#bulk-create-tasks) |
| [Create a Copy](#create-a-copy) |
| [Copy to Relief Registration](#copy-to-relief-registration) |
| [Merge](#merge) |
| [Send Communication](#send-communication) |
| [Export Detailed Cases to Report](#export-detailed-cases-to-report) |
| [Export Cases with basic applicant data to Report](#export-cases-with-basic-applicant-data-to-report) |
### Copy IDs
Refer to: [Copy IDs](https://docs.cw.crisisworks.com/concepts-and-fundamentals/on-a-computer/using-the-datagrid/bulk-actions#copy-ids)
### Bulk Edit
Refer to: [Bulk Edit](https://docs.cw.crisisworks.com/concepts-and-fundamentals/on-a-computer/using-the-datagrid/bulk-actions#bulk-edit)
Update for multiple Cases:
* Notes
* Event
* Region
* Status
* Priority
* Case Officer
* Field Officer
* Referral Source
* Classifications
* Tags
### Bulk Create Tasks
Use this action to add [Needs & Tasks](#needs-and-tasks-1) for multiple Cases.
### Create a Copy
Refer to: [Create a Copy](https://docs.cw.crisisworks.com/concepts-and-fundamentals/on-a-computer/using-the-datagrid/bulk-actions#create-a-copy)
### Copy to Relief Registration
Use this action to copy the Contacts in the Case to a [Relief Registration](#requests-assigningarequest-5). This can be used in cases where a Relief Registration wasn't initially created but you still need a record for one.
### Merge
Use this action to merge cases that are duplicates of one another.
To do this:
1. Navigate to the **Recovery Case** datagrid
2. Ensure all datagrid items are deselected, by clicking the checkbox icon at the top left of the datagrid until the checkboxes for individual items are clear.
3. Select two or more cases that are duplicates, by checking their select boxes.
4. Go to the **Actions** menu, and select **Merge**
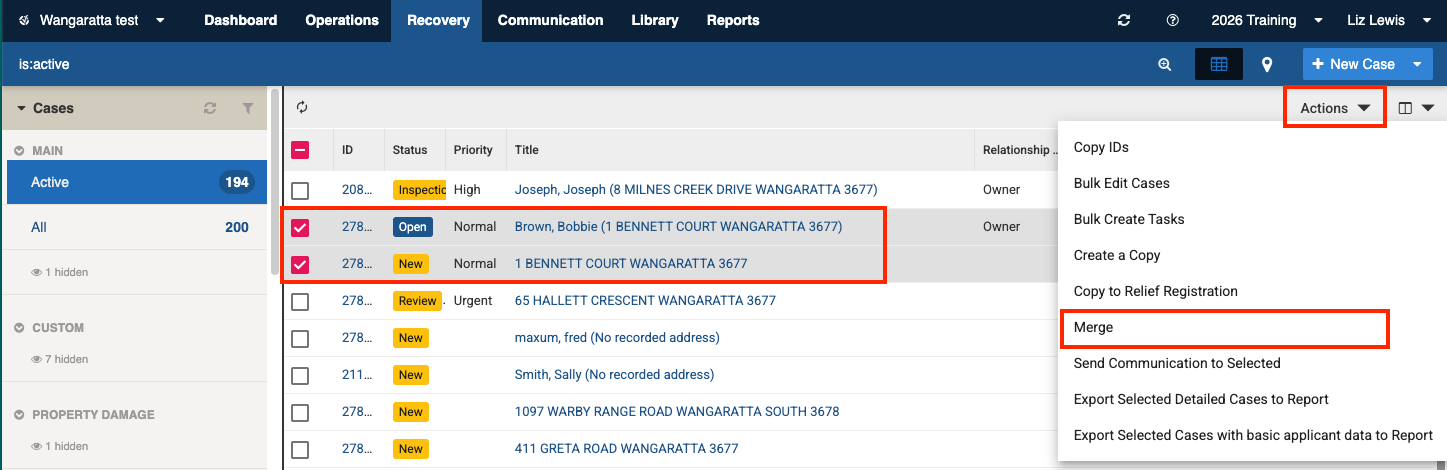
Tick Recovery Cases to be merged, select Merge from the Actions
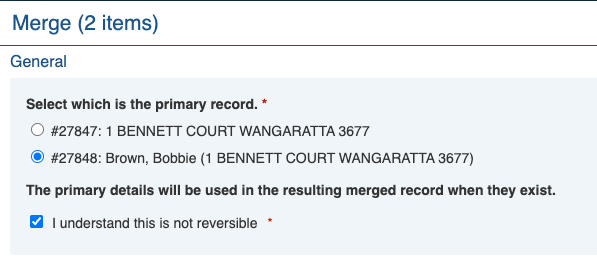
Cases to be merged, warning this action is not reversible.

Merge outcome screen

Specify the primary contact(s)
multiSubForm
(Recovery Contact)
| All primary contacts are linked to the new merged case. | | Add related persons and organisations in addition to the primary contact | relatedContacts |multiSubForm
(Recovery Contact)
| All related people are linked to the new merged case. | | **Impacted Property** |multiSubForm
(Private Assets)
| All private assets linked to the new merged case. | | Affected Agriculture | agriculture |multiSubForm
(Agriculture)
| All agriculture sub-items are linked to the new merged case. | | Environmental Health Assessment | recoveryEnvironmentalHealth |multiSubForm
(Environmental Health)
| All EHAs are linked to the new merged case. | | Affected Livestock | livestock |multiSubForm
(Livestock)
| All affected livestock sub-items are linked to the merged case. | | Damaged Infrastructure | infrastructure |multiSubForm
(Infrastructure)
| All infrastructure sub-items linked to the merged case. | | Sketch | sketch | canvas | Most recent sketch added. | | Photo(s) of property | photos | media | All photos linked to the merged case. | | Inspection Information | damageInfo | rte | Values from both fields are added. | | Hazards exist at site | hazardExists | checkbox | Most recently updated value. | | Hazard Information | hazardInfo | rte | Values from both fields are added. | | **Needs and Tasks** |multiSubForm
(Needs & Tasks)
| All needs & task sub-items are linked to the new merged case. | | **Other Information** |